Wednesday, June 20, 2012

Men's 3x goodwill shirt refashion

Shirt Refashion!
Finally, I came up with an easy (for my limited skills) men's button down shirt refashion!


The shirt was a really pretty blue and white button up in a size 3x. It was brand new, $2.00 at goodwill and had a pretty little Paula Dean embroidered pocket. I have been scouring Pintrest for ideas that will work but never found one that looked easy and/or had rockabilly flair.

Soo... The inspiration went like this.  I happened to notice the top a country singer was wearing in a video at my friends house.  I didn't get a great look at it and can't find any decent internet pictures but it was a cross between Alabama Chanin and Steampunk.Side note: I can't afford Alabama Chanin, but I love it! So this video got me dreaming about tubetop corset thingies in unfinished and fluffy greatness in many variations. I have two tops I am making from this inspiration and the men's shirt refashion is the first. Really looks nothing like it but you know how inspiration goes:)
http://www.cmt.com/artists/az/band_perry/artist.jhtml
inspiration

This is not so much a tutorial as a running event catalog. I ripped more seams in this project than I have ever imagined possible.

Supplies: Big shirt from goodwill, white ruffle (2 yards and way too much) with bias tape top.


Event sequence:

  • I laid a cotton tube top on the men's shirt laid out flat. Specifically centering the the outline to include the buttons down the front staying down the front.
  • To keep the buttons from gaping I sewed a matching seam down the outside line of the button series. I overlapped it on an existing seam so it doesn't look wonky.

  • I folded over the top and ironed down a straight line with a white button perfectly centered. I used a silly swirly seam (no reason really, wanted to try it:)

Fail events:
  • I copied the fold over in the back and ran elastic through it. But when assembled the back looked puffy and unfinished. So I ripped that out and shirred a few inches of the top. I wish I had shirred almost the entire back.
  • Original ruffles were sewn upside down and I imagined I could iron them down (rightside) and have a polished row/line. Nope they were too puffy and did not lay flat. so I made strips of bias tape and sewed the ruffle to the bias tape and then sewed it to the shirt. Before I found success I had all the rows sewn on. The seam ripper was the salvation because I didn't have fabric to turn to and I had cut up almost the entire shirt.
  • I wanted unfinished edges on the gingham but the direction I had to cut the fabric has it fraying. Fray check to the rescue. 
Success events again:
  • Prior to sewing the pieces together I shirred the back piece. Time consuming but looks very neat. This is the first time I have done so many. I used instructions from: http://www.makeit-loveit.com/2011/11/sewing-tip-shirringsmocking-with-elastic-thread.html
  • I shirred the top of the ruffle pieces and sewed them into the bias tape I made in equal lengths. I cut matching lengths of white store bought ruffle. Working from the top down I layered the ruffles. It helped to have the shirt still in pieces for this. They were easy to line up with the pattern of the fabric so I just eyeballed it. I have each ruffle starting up against the button line.


  • Ran a piece of elastic accross the top back for extra stretchy. 
  • Right side together assembled the pieces. 
  • Flipped right side out and started cleaning up all the threads. I still need to add the fray check to each blue ruffle but I am in love with it. I am wearing it today with a white jean jacket. With the shirt tails from the original shirt I can tuck it in or wear it un-tucked cute either way.
Next up a cream and lace shirred top more similar to the video inspiration.

Monday, June 18, 2012

Sugar Skull Sturgis Jewelry

Prototype 1

Sugar Skull Prototype 1:
I am gearing up for my annual Sturgis vacation. I can't meet up with all my besties without a cool gift (or at least my idea of a cool gift:)
Last year I made pinup girl necklaces and glitter mustache rings using shrinky dinks, necklace bezels, and art specific and unique for each. This year I am making something Sugar Skull.

This is my first prototype.


Supplies:

Tori Spelling necklace components: (from craft store Michael's and Joann fabric have the line - I purchased them on sale)

{styled} By Tori Spelling TM Glitz-Connectors Black 3.99
{styled} By Tori Spelling TM leather top half black necklace 3.99


Howlite Skulls: Etsy (4.00) vendor Smartparts


Had in supply box:
Freshwater pearls
Wire, tools etc.

How I am going to improve it:

  • Better photo next time! 
  • Instead of a wire loop as large as I have I am going to tighten the wire to the pearl and the loop will be to a silver jump ring. I think it will look more professional that way. 
  • Also need to play with the findings and the glue. The gorrilla glue did what I wanted and created a surface for the flowers to adhere to but the foaming nature of this stuff caused it to grow between the flowers and I can see it. 


Thursday, June 14, 2012

Organizing inside the cabinets

Necessity is the mother of invention.
Cabinet organizers are way too expensive but I desperately needed them. Luckily I have alternatives.
$50 dollars + a couple of hours = Kitchen declutter happiness
Where did I get the supplies: Extra Building supplies in Denver and a gift from my mom from ikea.

Why in the world are cabinet pullout supplies so expensive? Well I can't afford to do much with the retail options so I picked up the essentials at Extra Building Supply and applied a few hours of work installing the glides and sorting the junk. Now I have a great organized answer to the pans, tupperware, and baking dishes. The ikea stretchy variera is incredible for keeping everything in place.


Monday, April 23, 2012

Island Dreams!

The island is FINISHED!  


Well mostly, I still have a piece of trim to finish nail on. But I am calling it complete.

The final tally for supplies:

  • 1 Two door cabinet set, with two plywood laminate walls and 4 trim doors attached to to those ($125.00). I got those at Extra in Denver, formerly a part of an island (I assume a huge one) in a cabinet shop. 
  • Butcher Block (birch) from Ikea ($195.00). I did not see it on the website but I was able to order it in a large enough piece to accommodate the overhang on the back eating side. I was inspired to use this product from http://www.beneathmyheart.net/2012/01/ikea-butcher-block-countertop-answers-to-your-questions/. I treated it with the butcher block oil ikea sells, I love the natural texture.
  • Set of 3 new knobs from Lowes in a black metal finish ($9.00)
  • General framing wood to construct the base the whole configuration is sitting on, corner cabinet fasteners  plastic adjustable leg/feet thingies, wood edging,  from Rockler ($40.00) 
  • Bead board ($20.00)
  • Base trim and accent trim I used to accent the back and sides ($30.00)
  • Trash glides (19.00)
  • Rustoleum antique white spray paint ($12.00) Exact same color as existing cabinet. Wonderful.
Total $430.00

Notes:
Setup and Base Island


Bottom up...


Using the anawhite site I modified the overall base build to accommodate a full base across the two cabinets. I combined a few of the project posts she has available if search for island and cabinets.
http://ftp.ana-white.com/2012/03/kitchen-island-farmhouse-table-top
http://ftp.ana-white.com/2012/01/plans/kitchen-cabinet-sink-base-36-full-overlay-face-frame

19inch Cabinet and trash pull


I used a couple of sites for reference in this project. the first was Anna white http://ana-white.com. This site features tons of free building plans that make sense and work well. I used it for the 19 inch trash cabinet I added to the end of the island. The specifics of the trash pull out deviated but the concept was the same. Using a trash can that fit perfectly inside the cabinet I cut out an opening in scrap plywood that would allow it to drop down and the lip of the trash can catches on the wood. I framed it out and added some standard long pull drawer glides. To clean it up and make it look less like a scrap lumber project I covered it in plastic drawer liner and nailed it to the bottom. Now if trash misses it wipes right up and looks nice. The concept is similar to how a drawer would be mounted in a cabinet and the bottom of the drawer cut out to fit a trash can. I screwed one of the cabinet fronts to the wood frame and added a drawer pull to the top. This took lots of leveling and clamps and brute strength (thank you husband:) and luckily the top was not on so assembled from the top down.

Trash systems that you can buy ready to install in your cabinets would have cost  $199.00+ (http://www.kitchensource.com/trash/d/built-in/).  These would have been a smidgen easier to install but I saved a lot by crafting my own and it wasn't a great deal more difficult. The anawhite link to a plans: http://ftp.ana-white.com/2012/01/plans/18quot-kitchen-base-cabinet-trash-pull-out-or-storage-cupboard-door?page=4

Throughout this project I kept up Two boards of ideas on Pinterest.
http://pinterest.com/jenniferbutts/making-for-my-home/
http://pinterest.com/jenniferbutts/ideas-for-home/
The original plan to keep the definitively doing on the making board and the ideas on ideas board. Well I scrambled up part way through so both boards are a mix:)

If your tackling a project like this I hope this info helps. My handy husband was a must for this project and don't tell him but he is pretty great to help so much. I don't want him to get a big head!


Monday, April 2, 2012

Island progress update

The kitchen Island is starting to come along...

We purchased a big 11/2 inch thick butcher block counter top from Ikea ($195.00). It is the perfect size to allow for an overhang on the back of the island and 2 sides.  We will cut it down to overhang only the back and end (1 side).  I did not realize when shopping online for the counter top that a wider version is available in the store. So I have a wonderful chunk of Birch waiting to grace the top of the new island.

Hurray! The frame is now built so I can find the trash solutions for mounting inside the cabinet.

We created a new base to perch the whole setup on. This way we have something to mount a skirting to but allows us to adjust the height etc. We used feet that adjust that we purchased at Rockler.


I stuck my trash can in the hole to demonstrate the concept for my kids:)


Next steps:
The skirting, trash pullout, door mount, bead board, corbels, and the finish pieces. I hope to be done before entertaining on Easter.


Monday, March 12, 2012

In Progress Building Projects

In Progress:
This past week my pal M and I went treasure shopping at Extra (Denver CO, Extrabuild.com). We made a haul. I was tempted to keep the place a secret but in exchange for digital before and afters we negotiated a bit of savings. Secret vs Savings... I saved me some money and this is the plan. Plus if anyone goes and loves it like I did I can feel good about spreading the positive building mojo.

The before(s):

Project Kitchen Island
I spent $125.00 on a cabinet base and two panels with full size door/accents mounted on them.  The remainder of what was a island in a design showroom had been purchased by someone else but no problem because my space is small and this is perfect.


The Design Plan:

Bad photo shop mockup:)


  • I want to add a new 19 inch cabinet for the trash pull out. Luckily the large panel door thingies are the perfect size to attach to a trash pull out and look so perfect I must squeal. I love the idea of creating an island that is so affordable with such fine materials.  
  • Bead board all around the outside (ties into the Red cabinet redo from the rest of the kitchen)
  • Butcher block counter top.
  • Some finishing elements and done.
 It will look so awesome contrasted with my red cabinets. So I will keep posting wins and fails for this project. Also as much as I hate to share my new favorite source Extra is a girls dream.

Guest bedroom Headboard:
Found a cool door at Extra.  It screamed make me headboard and paint my little squares with chalkboard paint so we can leave our guests fun messages before they arrive.

The door is a simple one and the size perfect to cut down for the guest room full size bed.


The Plan:
Frame it in 2x6 and 2x4
Prime and paint the piece white
Fill insets with black chalkboard paint
Bad photoshop mockup:)

My hubby has the framing and nailing, screwing, etc done. I just need to take some pics and get oneot the  paint.More to come....

Jen


Tuesday, February 21, 2012

DIY Secret Jewlery Organizer (slides behind vanity mirror in bedroom)


Success! 

I feel wonderfully clever today. I created a Jewelry board that glides out from behind my bedroom mirror. Yep James Bond has nothing on me... I have a secret necklace organizer.
I have to admit that jewelry might be taking over my bedroom.  It doesn’t help that I keep on creating new pieces.  So organize and minimize impact is needed.

The mess:


How did I do it?

Supplies:
·         Red cabinet door (I created as a sample for the Kitchen refinish project)
·         Scrap of canvas
·         Piping (white I stained with coffee to look like soft rope)
·         Scrap of poly batting
·         Bits of cardboard
·         Staple gun
·         Glue gun
·         White hook Sets (painted beige with kryon)
·         Gold heavy gage jewelry wire
·         cabinet drawer glides (Lowes $15.00)
·         crayon

Building the board
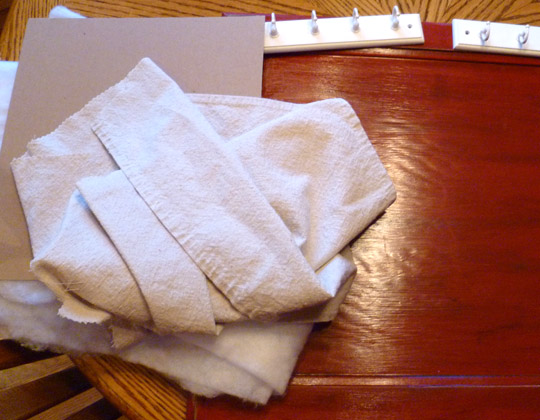
1    Simple construction and this can be done with any combination of supplies that make sense for your needs.  I used the cardboard, canvas, batting and staple gun to fold and secure a canvas batted insert to the cabinet door.
  1.  I carefully stapled the inset into place along the edge.  To be hidden in a later step.
  2. Using the gold wire and the staples I created 3 rows.  I stapled the end down and then twisted it to secure. Repeat on all sides.  Again, this is all hidden in a later step.
  3. I was determined to use supplies on hand so instead of purchasing rope when I realized I had none I instead used a length of piping (cotton and so soft) and stained it in coffee. It smells sooo good!
  4. With a bead of hot glue I ran a continuous border to the batted inset. This worked to hide the staples and twists on the wire.  When I was finished I wrapped it in a flower(ish) swirl to hide where the two ends joined. I also figured I could fasten broaches and things into the soft cotton if needed someday.

At this point I mounted the board to the wall because I didn’t want the hooks to get in the way as we fastened the glides to the back.
Hanging the board
  1. While the dresser was in place I drew a line in crayon for the border of the mirror.
  2. Using the furniture slides my dad gave me for Christmas we slid the dresser (nice time to vacuum)
  3. Finding the Stud and holding the glides up we marked where the glides would be mounted
  4. Mounted the glides to the back of the jewelry board.  Careful to mount correctly for the direction of the slid. My husband actually did this partJ thanks for the great help honey.
  5. Holding the board with glides fully extended we mounted the board to the wall. Just like a drawer we used a glide at the top and the bottom. This was a really quick effort because the husband came ready with all necessary tools. Level, drill, bits, extra screws, etc.

Final Touches
Depending on the needs of your board it may not be necessary to apply the hook boards. I have a ton of heavy stuff that I plan to pile on it. After all no one will see it!
  1. I attached the hooks
  2. loaded the board with baubles.

I slid the dresser in place and done!   No more dumping stuff all over the dresser to find a piece.