Thursday, December 22, 2011

Nintendo DS Game(s) Keeper DIY


Nintendo DS Game Disc Keyring DIY
Drive management for kids in car for extended time continues...

My kids are 7 and 10.  Both have a Nintendo DS and assorted games magical little 1x1 plastic bits that cost a $20-60.  They are constantly being misplaced and dropped in the seats of the truck. Previous road trips have included countless efforts by me to load games back in boxes identify what is missing, tear the truck apart looking for it, repeat! To date no man has been left behind but I just don’t want to go through all that.
So I started trying to solve the problem.  First stop toys-r-us.  Wow! How a tiny box that fits in another box is going to be answer to all game management is beyond me.  They struggle to keep it in the box it came in; creating a new process with a tinier box does not seem the answer.

I want these on a keychain I told the clerk.  Like keys! Nope I have never seen anything like that.

Google searches and Pintrest searches (my always winning idea sources) reveal only more opportunities to arrange a process that the child will place tiny game in a slot or box or bag. 

Off to the office supply store, I remembered from a lonnng time ago binder supplies included little paper strips (sticky back) with metal loops to add pamphlets etc. to a binder. I may be dreaming about those because the looked at me like I was crazy. But after a lot of searching and looking like a nice lady who needs solutions I had 2 different office stores give me some pages of adhesive hang tabs (from their internal supplies and no charge). I had an idea that started brewing.

Walking around the office store I found some cute lightup keychains for $2 each and some keychain rings. 
This is how it came together after much experimentation.

Step 1: I placed a game in the console and examined how it set in place. Using the tab portion (NOT THE STICKY AREA) I discovered I could slide it into the top of the game/disk without the disc being moved or bend in any direction. The game is snug on the bottom nothing can be attached to that side without the game bending in place.

Step 2: Using a least popular game I cut the tab down to fit securely without effecting the game insertion or position. I cut the sticky half (while it was still on the paper protection sheet) to look like a smaller square. I was careful not to jeopardize the security of the tab. A tear or overcut would cause it to fall off the keychain and invalidate the effort.
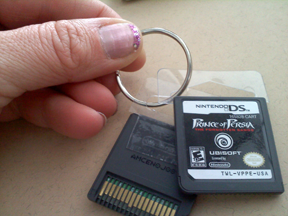
Notice the plastic is cut smaller to not interfere with the game cartridge dimensions

Step 3: String on a keyring, add the new handy light, a cell phone layard to attach it to game console and SUCCESS.

In the dark they can still read their game titles.  

Project out-takes:  My fails include multiple efforts gluing jewelry findings to the front portion of the game disc. But they pop off. I tried gluing necklace wire as well, pops off. I took apart one game disc and looked inside and ruled out any drilling or inserting findings in the plastic housing.  I was worried that it would affect the electronic pieces.

Wednesday, December 21, 2011

Getting a 10year old girl to plan and pack!


The holiday drive to North Dakota is on final countdown. We have just enough time to wash and dry needed cloths and get them in the cases ready to go. 

  Last year when we took this trip over Thanksgiving Makenna (my then 9 year old) cried for an hour.  It went like this… “I know you forgot what I need”, “Why did you pack for me”?, “what will we do if I don’t have enough stuff to wear”?, and on and on and on.

Cut to this year Makenna is now 10 and even spunkier (nice adjective instead of what I really think).  So this is the printout she is being given tonight to complete. Once finished no revisions or exceptions (maniacal smile).


Friday, December 16, 2011

The Christmas Craft and Gift Summary:
As I finally finish the many handmade gifts (which is taking a considerable amount of time) I am going to post the ready to give version.

Office Cocoa and Peppermint Schnapps:
$3.00 a piece
I couldn't figure out how to tie the tiny Schnapps to the tiny cocoa so I folded down a plain brown lunch sack and added some ribbon to hold the little items.  I made some of the cocoa for my kids and if you follow the instructions it makes a very rich drink.  Next year I will modify the instructions to allow for a less dark choc version.  This is a perfect mix for adults and will be super yummy with some peppermint schnapps.


Bracelet and Ring for a Girlfriend:
Twice I have jumped onto Pickyourplum.com and gotten a fun set of resin flowers for an inexpensive price. I paired a couple of them with a cute bracelet from Joanne fabrics new line of Plaid resin flowers and findings.  I love how simple and pretty and it looks.

Bracelet and Ring
Flowers: $.25  (from my favorite set a combined sizes and styles)
Bracelet: $2.49 (half price on sale)
Total: $2.74
The funny part about making jewelry for friends is how much I don't want to give it away after I finish. So the cost of not keeping it for myself should be factored in the overall value:)


Keeping this one for myself:
I found a cool flower sugar skull style image on pintrest. I copied it, shrunk it down and printed it on photo paper after making a black and white image.   Using my circle punch I cut it out and started the process of carefully layering crystal effects like a resin cover.  I had to dab it on to start the process and keep the paper and image from soaking in moisture and smearing.  After it was well coated on both sides I used the crystal effects to press it into the finding (a cool silver flower from Hobby Lobby) and started layering the goo until I had the start of a dome.  At some point in that series I dropped 2 of the resin flowers into the goo on the side and sat them on the lip of the flower inset.

I LOVE the look so now I am keepin this one for myself.
Flower: $2.00 (half price, I only buy with a coupon or sale)
Resin Flowers: $.25


Wednesday, December 7, 2011

Anthropologie DIY Knock Off


Anthropologie silk scarf necklace knock-off
The original


My knock off


How I did it (drawn out below after description):
Ribbon is half off at Hobby Lobby in Colorado.  Score I purchased a few (I had the leather lace and chain). All told the investment was $7.00 and I made 2 necklaces! Christmas present score!!

  1.   I chopped random lengths of the ribbon and tied them into one very long chain. I have each tied point a bit long so you can see they are tied. I tied the leather lace into this as well. I did not add the chain until last.
  2.   I used a lighter to melt a finish on all the ribbon so it does not fray.
  3. I created a long loop of measuring 40 inches. 
  4.   Create a small extra loop that extends beyond the bundle. Hold in place and...
  5. Sew down the loops for security
  6. Add the chain (I tied it into a sewn down piece) 
  7. Wrap the ends cover all the mess and and tie or glue the wrap end
  8. Sew a button onto the end without the loop. 
 Now fasten and wear!


Tuesday, December 6, 2011

EMILY's Cranberry Salad

EMILY's Cranberry Salad
 (Judy Brown original family member submitter)

1 large raspberry jello
1 1/2 cups boiling water
1 small can crushed pineapple - drained

1 can whole cranberry sauce
1/2 cup water
1 cup nuts
Mix together (Jello and boiling water first until dissolved)refrigerate until firm

Topping:
1/2 cup sugar
8 oz sour cream
mix and spread on top of jello mixture when set.

Thursday, December 1, 2011

Christmas Craft Day Lesson Learned

Christmas Craft Day Lesson Learned and Details

It was so fun! I had a bunch of friends over and we crafted like crazy elves. First on the list "Christmas Cookie Jars".

Lesson 1: I assumed too much. I assumed we would have time to create labels (I didn't finish them), I assumed a quart jar is a quart jar, and I assumed it would be easy.  Nope to all. The Kerr Jars did not hold the ingredients so a couple of gals have a ready bag of mix for cookies at the next exchange:).  I created labels the next day and mailed them all to my peeps. It was a bit challenging to figure out how to do it well. We decided (by we I mean my smart friends I was not part of the solution). to set it up in stations with measuring cups in front of every layered item.  We did a lot of pressing and forcing the layers tight to get it all in. The inspiration site (Bakerella.com) warned it would be like that but the Kerr Jars just didn't allow the ingredients.
Making labels the next day. 

They look fantastic

I made a bunch:)

Next time

  • print instructions and labels in advance  with a station for adhesive to apply
  • Use individual measuring tools for every ingredient
  • Use a canning funnel 
  • Prep the space in advance of the gathering so your buds can get right to work
  • Walmart sells smooth quart jars by the case for $6.00 best price I found, and ready for craft fabulous. The .50 jar made the total cost of materials very low.

Lesson 2: Pearls and leather are not made for each other. The Pearl holes are way too small.  So I purchased 2 separate pearl reamers and after more time than sense still toooo small. So I pulled out the dremel, used a bit that matched the diameter of the leather and filled a small bowl with water.
It works like this:
       step 1: wrap the pearl where it pinches in pliers with makeup sponge cut to fit to protect it
       step 2: Start the dremel and get comfortable with the weight and gyration and slowly bring the bit to the  
                  current peal hole and start a slow and gentle drilling. (If I pushed too hard when I finished the
                  hole the dremel would drop forward and scratch the top of the pearl with the top of the bit holder          
                  thingy.
        step 3: often pull back and dip the bit ONLY in the water to coll down the tip. The pearls smell bad and
                   get hot. So it is important to coll the bit often to avoid a black burn on the inside of the pearl.
        step 4: don't touch pearl after drilling, they are HOT.
        Note: I read Pearl dust is toxic so wear eye protection and something for you mouth.

The leather and pearl jewelry turned out so pretty but I forgot to take pictures. Good excuse to make more.

Lesson 3: Scarfs and ear warmer are easiest with lots of material and the best ear warmers turned out to be the ones we used the purchased black band and embellished. The favorite pattern for the scarfs was the circle ruffle one.
hard to photograph with the cell phone:)
Lots of flowers and ruffles added for my nieces. The gray is pretty similar to the inspiration piece here:   http://www.craftstylish.com/item/41268/how-to-make-a-cozy-spiral-scarf Hands down the best tutorial for how to do this!


Making the pattern with wrapping paper and a pizza pan. Improvise!

Thursday, November 17, 2011

Added Stuff for Craft day

Added Stuff for Craft day

Drink Jar Recipes from: http://www.myrecipes.com/recipe/classic-cocoa-10000001011198/


So cute! I will have all the tags precut for ease:)

Ingredients

1 cup granulated sugar

1 cup unsweetened cocoa powder

1 cup powdered milk

1/2 teaspoon salt

1/2 cup miniature chocolate chips

1/2 cup miniature marshmallows

Preparation

Layer sugar, cocoa powder, powdered milk, salt, chocolate chips, and marshmallows.


Ingredients

1 cup powdered milk

1 cup unsweetened cocoa powder

1 cup granulated sugar $

1/2 teaspoon salt $

1/2 cup miniature chocolate chips $

1/2 cup crushed peppermint candy

Preparation

Layer powdered milk, cocoa powder, sugar, salt, chocolate chips, and peppermint candy.

Note: This mix will fill a 1-quart jar (12 servings), but if your containers are different sizes, just keep the ratio of ingredients constant. On the back of the tag, write: "Mix contents in a large bowl. For each serving, place 1/3 cup cocoa mix in a mug and stir in 1 cup boiling water. Store remaining mix in airtight container."

Also I grabbed some cute resin flowers from Pickyourplum.com
I will have a few options if you want to make a few jewelry pieces. .79cents for the flower. SCORE!


Monday, November 14, 2011

DIY Popcorn Gift Set


Popcorn Gift Set
Simple and sweet, salty or savory...

This gift arrangement is based on a small box designed to serve popcorn from. inside the box we can add:
  • microwave popcorn bag
  • custom seasoning
  • DVD
  • Movie Gift Card
  • Jump Drive with home videos

The idea occurred to me when I purchased an expensive sea salt and vinegar popcorn flavor seasoning at the store.

Seasoning Recipes:


Salt and Lime
1/2 cup salt
4 - 6 packets true lime


Chocolate Lovers
1 tablespoon cocoa powder
1/2 cup powdered sugar

Cheddar Bacon
1/2 cup Powdered Cheddar Flavor
1 Tablespoon Bacon flavor

White Cheddar
1/2 cup Powdered White Cheddar flavor

Ranch
2 tablespoons White Cheddar Flavor
3 tablespoons Powedered Ranch Dressing Mix


Waffle Iron Possibilities


The waffle Iron (My best weapon)
I can’t help but notice all the waffle iron like products available now.  You can get one for cupcakes or donuts, or convert to Panini.  All told it would be a lot of money and storage space to house the many varieties. But the display in Macy’s got me thinking, and then googling and the ideas started flowing.

Idea number 1:
Splendid! Cake mix and simple scream “Try this Jenny”. So I did. It was awesome and I told my friends on facebook.

Idea number 2:
Then I got to thinkin… Yep it hurt! Muffin mix is a lot like cake mix and dirt cheap. So I tried strawberry and it worked so well I told my friends on facebook. My friends K & M (yep initials, for the record this how we refer to each other in text messages) hit the idea and made a number of flavors. It is tested and certified for success.

Idea number 3:
Yesterday I got a text from my bud H and her hubby and boys took it to the next level.  Imagine a drum roll because this deserves it.   Grands Cinnamon Rolls in the can. Genius, Brilliant, wonderful.  Her boys added syrup or glaze to the finished masterpiece and they looked so delicious.

I will update this Waffle  Iron idea list with all tested and wonderful creations.

Thursday, November 10, 2011

Burnout shirt mishap and refashion to the rescue


Burnout shirt mishap and refashion to the rescue

I created a bunch of burnout shirts for a local gymnastics team support crew. I ordered Bella Burnout shirts and applied a rhinestone design (I created with the Silhouette) and some iron on logo stencils.
How the mishaps? Before I got my act together I tried to use Martha Stewart everything paints instead of the glitter vinyl stencil.  That did not work. In fact I used her silver foil, glitter transfer sheets and adhesive as well and none worked for me.

Long story short a few shirts had problems.  Enter the refashion.

  1. I used the reverse applique technique detailed at Sweet Verbena.   
  2. Mostly gone errors:)
  3. Simple oval to remove stuck together paint from the right top of the shirt.  
  4. I clipped the hem off a bad shirt and applied a 2 layer ruffle and added flowers made from the standard stacked circles and cross sewing on the machine. Using some circles cut from the rhinestone letters incorporates my pink color scheme I am using on the sugar skull. Bingo no more ugly mess.    
  5. I found a beautiful sugar skull image online at some point. I wish I could credit the designer but I clipped it for a tattoo idea and didn’t capture the artist name.  I loaded it in my silhouette cut line tool and went about meticulously creating an iron-on and weeding out the relief.  
  6. Bad photo I will try again with some help
  7.   Ironed onto the bottom side and my refashion took 30 minutes and now I have a fun shirt.

Tuesday, October 25, 2011

Christmas Craft Day Lineup

I am having a Christmas Craft Day. I have planned out a bunch of gift ideas and invited all my friends.  The goal is quickly and inexpensively while having fun make lots of gifts affordable and quick. Each of these ideas are based on things I have seen or have patterns for. I made printable labels, tally cards, and signs to make it easy.  The SilhouetteSD will be working overtime for this day.

Pick your gifts or propose new ones and then…
  1. I will purchase, organize and prepare everything for that gift assembly on gift day.  I assume everyone will help each other with each series of gifts if people need a hand. On Christmas craft day **BAM** it is all ready and the group will bust out the presents they wanted in no time flat. 
  2. Let’s leverage our coupons and sales.  If we can agree on supplies and fabric etc. we can buy it with the best bang for our buck. I may enlist some help hitting the stores:)
  3. Propose changes or offer other gift ideas.  These are just mine, what did you need/want to make this year?
  4. Set the date. I propose 2:00pm till done on November 26th (I am guessing about 4 hours).
5.       Bring a laundry basket or 2 on craft day to house and carry this serious haul.
6.  Invite anyone else you want. If it gets big I can arrange to use our church. Otherwise I will host it at my house in Littleton.  I will provide lots of snacks and drinks to keep our energy up.

I created some tags, cards, labels etc. You can use them or create new ones. A link to the pdf I made for each is in the boxes below.

Gift Idea Line-Up
Note Click on the title to advance to the proposed supplies and cost breakdowns.


in-a-box

Click to link to gift idea contents and supplies. Total cost of gift $7.00 (depending on how many ingredients).

Lemonade Stand box kit for kids:
Idea is to package them in a clear top bakery box with ribbon and label. Click here to download the .pdf with labels, tally sheet, strategies, sign, etc.
Ice tray $1.99
Wash cloth $ .39


Whisk $.99
Lemonade stand sign:
On plastic vinyl with black letters 17x12. Rolled up with a yellow ribbon.
Drink Mix any brand
Cups (25) 6 oz. size


Labels, lemon images, etc. Copyright of Mixedupcraftingblog
Cookie Jars
(I will have labels and fabric unless you want a special idea)
M&M Christmas
Gingerbread
Sugar

Hot drinks
The list goes on
$3.50 each unless I get a good deal on jars:)


FYI: gingerbread Jar recipe we can add a cookie cutter
Note from my bud Stacey for Jar success:
Lessons learned about cookie jar craft...
A funnel helps a lot, also when making jars having a cake pan catch all the crumbs makes for easy & fast clean up.
Christmas Card Holder
$5.99 at Ikea and $1.50 for sign
filled with hand-made thank you cards. The sign for above is optional it can fit with the thank you card design we use.
Merry Sign
NOEL sign 


Cabinet Measuring Spoons
Ikea and the dollar store have supplies.  $5.00
I plan to make a set for myselfJ


Cinch and Ruffle Cinch bags
$3.00
Inspired by: LittleBirdieSecretsblog  as a copy of a ThirtyOne bag.


Note: I will cut any iron on design desired with my silhouette so don’t assume it has to be ruffled or with a skull. These are just the designs I am doing.

Hats, Scarf, and Ear-Warmers
scarf $2.00, earwarmer $2.00 Flannel and felt are very inexpensive and I will also use a coupon.
Inspired by a bunch of places: momtastic.com, instructables.com, prudentbaby.com, fleecefun.com


Note: The options are endless for this series I will have templates, ideas, etc. printed for this station so you can go crazy or stick to a plan. If you want special designs cut for iron on get them to me in time to have) 
Leather and Pearl Jewelry
Inspired by: LoveMaegan.com
Real freshwater pearls and leather and supplies $2.00  with real bleached fresh water pearls and leather cord. I created a sample to be sure it all worked nicely.
Card to attach for gift giving 


Based on the steps Maegan outlined this is very fast and super beautiful. I made some cards to hang them on for gift giving